CHANGING YOUR COPPER

Two metal tags with a zigzag shape and a small hole in one corner, showing signs of oxidation and corrosion, placed on a dark surface.
Four small, rectangular, metallic tags with jagged edges, each with a hole in one corner, arranged on a black surface. The tags are aged and painted in different colors: silver, pink, orange, and turquoise.
Porcelain pipes and a small soldering iron on a black table, with a person wearing a pink shirt standing behind a transparent plastic structure that holds electronic components, possibly for a project or repair.
A person wearing a pink shirt standing behind a black table with an electrical setup, including wires, tools, and a clear plastic box with an electric stove on top.

Use the flathead screwdriver to hold the screw head in place on the bottom of the cooler.

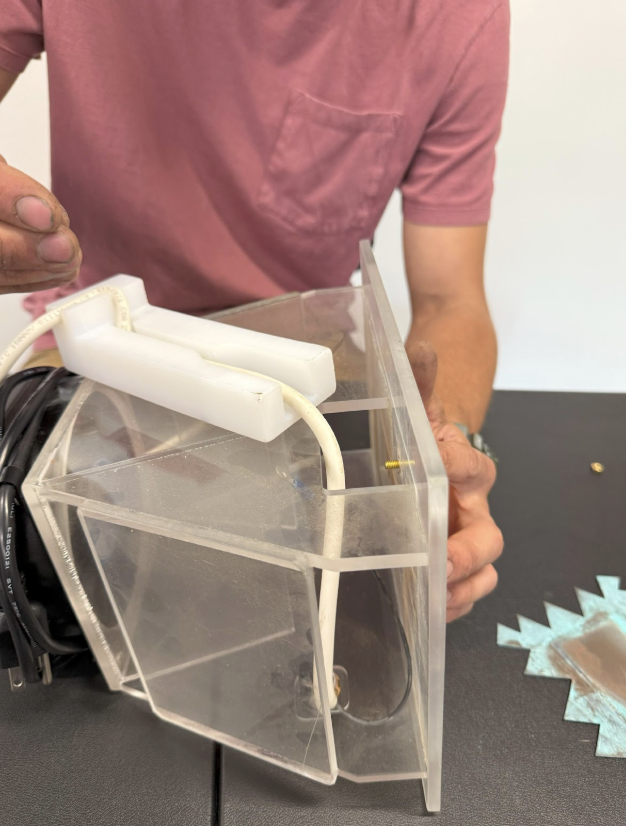
Next use the wrench to turn the TOP NUT inside the cooler.

Once the nut is loose unscrew the top nut completely and remove the ring terminal from the screw.

The ring terminal is the silver connector attached to the wire.

Close-up of an electronic device with white cables connected inside a clear plastic enclosure, with a black wire and a blue connector visible.

Now the ring terminal is disconnected from the screw.

Person using a screwdriver on a glass panel or object inside a clear plastic container.

Place wrench on remaining nut and brace the screw head with the flathead screwdriver. Loosen the remaining nut and remove from screw.

A person is adjusting or repairing a theodolite or a small robotic device with a clear plastic body and metallic components, on a black surface.

Once nut is removed pull screw out from hole in base and remove copper.

A person in a pink shirt standing next to a black table with a clear plastic container and two decorative metal bookmarks on the table.

The old copper is now out of the cooler and ready for the new copper to be put in.

New coppers come with fresh nuts and screw.

Person placing a decoration on a large, copper-colored, star-shaped cutout on a clear acrylic display stand.

Flip your cooler upside down for easier access  and wipe off any dust or residue on bottom of cooler.

Thread brass screw into the hole in the new copper then put screw and copper into the base. 

The copper should fit in the indented area with relatively even space between points on copper and the edges of indented area.

A person in a pink shirt is working with a transparent plastic device that has a white cord and a white rectangular component on top. They are assembling or inspecting the device, which is positioned on a black surface with a blue paper snowflake cutout nearby.

Tilt cooler on its side and thread first nut onto screw.

A person in a pink shirt uses a screwdriver to work on a small, clear plastic device with wires and a white component, on a black surface.

Using flathead screwdriver to brace the screw head, lightly tighten the first nut with 11/32” wrench until copper is secure.

Once first nut is secure put ring terminal back onto the screw, then add second nut on top of the ring terminal.

Close-up view of a person inspecting or working on a transparent acrylic or plastic tank with white tubing and a small brass fitting connected to a wire inside the tank.

Now that the second nut is over ring terminal lightly tighten the top nut with wrench until secure and ring terminal does not move freely.

Person working with a small electronic device, using a tool to adjust or repair it on a black surface with a screwdriver and some small blue patterned material nearby.

Using the wrench lightly tighten the nut, notice how he uses his fingers to hold the screw in place while tightening the nut

Green checkmark inside a box with an overlapping checkmark.
Close-up of a small enclosed testing chamber with a clear plastic cover, connected to a tube and a valve, and a copper plate inside.

It’s very important that the wire does not touch the copper or sit over internal cutout.

A clear acrylic box with a copper plate inside, a white cable, and a brass screw on the bottom, on a black surface in front of a person wearing a pink shirt.

This picture shows incorrect wire placement.

Red circle with a red X inside, indicating a warning or prohibition symbol.
Person assembling or adjusting a white device with screws and a metal surface, possibly a piece of laboratory or technical equipment, on a black work surface.
A person using a screwdriver to assemble or repair a small white device on a lab or workspace table, with a black power supply unit nearby.
A scientific or industrial device with a black power supply, a clear acrylic container, and a white base, possibly used for experiments or testing.

You are now ready to put the cooler back onto the base.

Make sure: 

The copper is over the foil.

The black line is lined up to the opening of the cooler.

If you do not have a black line on your clamp block you can align edge of block about 1/8” away from the internal cutout over copper.

Now insert the brass screws into the clamp block and screw them into base, do not over tighten.

Congratulations you changed the copper!

Before you turn your Enhancer on, remember to plug the bulb into the cooler and the fan cord into the back of the white power box.

Images of coppers that are ready to be changed.

Notice how the points are rounded on the top copper and both coppers are thinner than a fresh copper.

The bottom “bluish” copper has more blue deposits but could be cleaned one more time before having to replace it - visit HERE to learn how to clean your copper.

Upper Right shows a new copper in comparison to the other 3 coppers that need to be replaced.

To start you will need a flat head screwdriver and a 11/32”  wrench.

We like to wrap the fan cord around the fan to keep it out of the way.